Skip to main content
How To Make Foil Texture For Scrapbooking

It is really easy to create Foil Texture using Photoshop Filters. In this tutorial I will show you how to make foil texture step by step.
If you don't have Photoshop you can get a 7 day free trial using the below link.
After download and install Photoshop on your device when you open the app you will see a interface showed in below image. Click on File on upper right corner of Photoshop.
After Clicking on File click on New to open a file you will work on Photoshop.
After you click on New a new Interface will pop up for the width height and resolution of file. keep the file type on Pixels. On Width section write 1000 and in Height section write 1000. Write 300 on Resolution and in Color Mode choose RGB Color. Then click on Create. See the image below
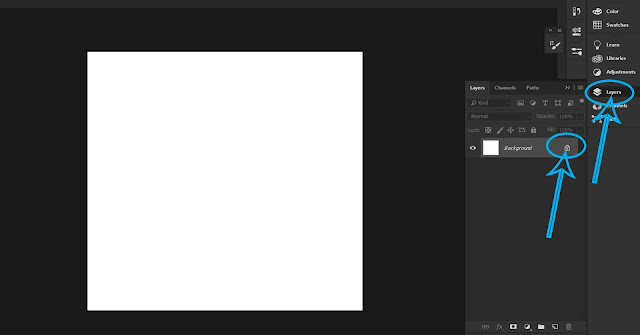
After you create a new document. You can see many panel on your Photoshop. If you are new in Photoshop this things might be too intimidating but it will be better if you keep using the software. In your right panel you can see a panel named Layers, click on the Layers panel and you will see a new panel open up, for unlocking the Layer click on the Small Lock on the layer. See the image below for better understanding. If you have problem finding Layers option click on Windows in upper panel and you will find Layers option click on that

In the Left section of your Photoshop you can see two color option. One is black and one is white. This is default color you can choose the color you want to use clicking on this two color.The front color is called Foreground Color and the back color is called Background Color. See the Image below for better understanding.
Click on the Front Color option and there will be new color panel will pop up. For selecting color you can choose any color you want or you can use the color I am using. I made a Rose Gold foil texture on this tutorial. So my front color was light shade of Rose Gold color.
For making Rose Gold foil texture give the Hexa Color Code I am giving on the option I showed in the image below. Type f9c3c3 on the option I marked on the image
For choosing Background color the process is same too just click on Back color option and a new color window will pop up. See the image below
Give the Hexa color code I am giving or you can choose any Dark shade of Rose color. The background color code I used here is b77f7f
***Note: For making a foil texture of specific color you just need to choose Light Shade as Front of that color and Dark shade as Back Color***
After choosing color go to upper section of Photoshop and you can see a option called Filter. Click on Filter option then choose Render then Clouds.
Filter→Render→Clouds
After that you can see cloudy rosy looks on the file like the image shown below.
Again go to Filter Option and this time choose Filter Gallery
A new Filter Gallery option will pop up you can see multiple option. Click on Distort Option and new Distort option Panel will be open up and after that click on Glass. See the image below.
Filter → Filter Gallery→Distort→Glass
In Glass panel choose Frosted Option Distortion at 15 Smoothness at 2 and Scaling at 113 and then click OK.
After this steps you will get beautiful Rose Gold foil texture using Photoshop
For learning better how to create textures and patterns you can visit Skillshare. You can get 1 month free trial on Skillshare using this link: https://skl.sh/3gDSgSS with the coupon code ABG
If graphic designing is not your thing don't worry you can download free foil texture from my blog going to this Link

Comments
Post a Comment